Showing posts with label vegetarian. Show all posts

Wednesday, June 15, 2011

We're in a little bit of a pickle, Dick.


What's my pickle? Chanticleer forgot to wake up the darn sun, and that's spelling bad news for my activity level.

Needless to say, I'm bored. 

And with summer playing a hilarious game of hide-and-go-seek, my vitals..are...droppingggg...... 


Lucky for this blog, that means I've been cooking non-stop. Oh, which also means eating non-stop. Isn't that what we do when we're bored? Could someone please remind me that, no, that's not what we do?

Not a moment too soon, I snapped out of it and realized that it was time to whip my booty into shape-- the treadmill had to become my new best friend. Scratch that, the treadmill will never be my best friend. Let's say, newest frenemy. It's a complicated love-hate thing, you wouldn't understand.

But, then again, you probably would.

Completely unrepresentative of the week I had (err, ate), I'm posting one of the recipes that did not involve cheese or sugar. Scratch that, there was sugar. But I swear that it's all worth it in the name of a pickle. A homemade pickle. Your homemade pickle.


Homemade Pickles
Lightly adapted from Lottie+Doof
Makes 1 jar

[2] mason jars

[4] baby cukes
[1] tbsp Kosher salt
[1] tbsp raw sugar
[3/4] cup distilled white vinegar
[1] tsp ground coriander
[1] tsp mustard seed
[3-4] garlic cloves, halved
[1/2] cup fresh dill

Thinly slice the baby cukes into rounds. (You could also make a batch of spears!) Pack them into one mason jar.

In the other mason jar, combine salt, sugar, spices, garlic and vinegar. Cover tightly, then shake until the salt and sugar have dissolved.

Pour over the cucumber slices.

Lastly, jam the dill sprigs in between the cukes. If there's room a the top, fill with water until the soon-to-be pickles are completely submerged. Cover and shake again so that the dill, garlic, and spices are completely dispersed.

Refrigerate overnight.

I got a pickle, I got a pickle. I got a pickle, hey, hey, hey, HEY!


The mustard seeds gave some serious spice to these sour little guys! I, personally, am a pickle fanatic [insert joke here]. I loved making my own, and I'm pretty excited that I finally know how! Usually, making your own pickles requires cooking and heating and technical know-how that I have the slightest desire to explore.

So, I'm sending my sincerest thanks to Lottie + Doof for making this easy on us. Your name is silly, but your pickles mean bu'ness.


I'm also going to give a quick shout out to my iPhone 4, who was responsible for taking all of these photos after my Fugi ran out of batteries. That was strike three, Fugi. 

Thursday, June 2, 2011

You must be Coconut Dreaming

Okay, I'm about to admit something big, here. You ready?

This recipe idea isn't mine. 

Try as I might, I cannot entirely lay claim to this little piece of genius. But Angela Liddon sure can. (Darn her and those innovative baking skills). 

The basic recipe that I'm about to share comes from her phenomenal blog, Oh She Glows. Angela is essentially the Vegan Superwoman, armed with whole grains, bananas, and an oven mitt of gold. Ha, yeah... she's that good. 

Anyways, apparently I've been missing out BIG TIME on this one. While I was sittin' pretty with the Quaker man, a culture of devout Overnight Oaties were capitalizing on the deliciousness of a make-it-ahead breakfast. Without me. 

Sure, I've had my fair share of hearty cereals. But Overnight Oats? Excuse me, what?

In case you were sitting next to me under that damn rock, overnight oats involve zero cooking, complement almost any sweet flavoring, and can be topped with whatever treats your crazy heart desires. They don't require any prep time in the morning, either, so on-the-go breakfasts become almost too easy. Basically, they make packaged oatmeal look like dust in a bag. And you, my friends, deserve much better. 

More specifically, overnight oats are a combination of regular oats, a liquid (like soy milk, almond milk, moo milk, or water), chia seeds, banana, and fun add-ins. I've never worked with chia seeds before, but like Overnight Oats, they're a sort of super health food phenomenon. When added to the mix, they transform your typical oatmeal into a thick, fluffy, and filling cereal that practically doubles in size by morning. Click on that link to learn more.  

You know you want to take a bite. 

When I found Reduced Sugar Maple & Brown Sugar Quaker Oats, I thought I'd hit a gold mine. 

Then I discovered Kashi Go Lean cereal. With 13 grams of protein per serving, I literally thought I was set for life. 

Finally, I settled on Hodgon's Multigrain Oatmeal, and was convinced I'd reached breakfast nirvana. 

And then out of no where, these Vegan Overnight Oats rocked my world. 

Yes, they're cold. Sure, they're vegan. And yeah, they're "healthy." But the fact that you can mix in any flavor (be it coconut, almond, vanilla, or cocoa), then top it with any fruit, nut butters, syrup or chocolate? The possibilities are endless. This is definitely one breakfast that I'll be leaping out of bed for.

Wednesday, June 1, 2011

Memorial Day Trifecta: Food, friends, fun (and THREE recipes)


Memorial Day was fun. A lot of fun.

As promised, there was food... (A lot of food). There was wine, there was merriment.   

In fact, our Memorial Day barbeque marked one of the most enjoyable cooking adventures I've had in a while. 

Why you ask?

For one, the food was good. Okay, the food was freaking fantastic, but that's not the whole story.

I know what I'm about to say is really corny, but cooking with the famjam and sharing the whole experience with some of my closest friends is exactly why I enjoy doing this so much. Great food, even better company. It's a combination that just can't lose. 

Imagine the delight in being able to put a smile on someone's face using a simple, yet devilish combination of flour, sugar, and (coconut) butter.... Now that's what I call fun. 

The entertaining, the socializing, the noshing-- about as good as it can get. It was fabulous. 

These recipes seriously exceeded my expectations. I hope you all enjoy them as much as we did. In case there was any doubt, the damage we did on this summer holiday feast pretty much confirms it. Sadly, most of the photographs were taken after the carnage.

-----------------

Homemade BBQ Sauce on Seitan Sandwiches
Makes a lot of sauce, approximately 4-5 cups 


Barbeque Pit Masters, here I come. This was my first attempt at making my own barbeque sauce. I'm not going to lie, I was nervous (people can be pretty picky about what goes on their pork), but my BBQ obsessed sister raved that mine was to die for. Phew. Success.

[1] small onion
[1] tbsp olive oil
[2 1/2] tsp salt
fresh cracked pepper
[2] 6 oz cans tomato paste
[1 3/4] cups water
[1/4] cup light brown sugar, packed
[1/3] cup molasses
[1/3] cup apple cider vinegar
[1/2 to 1] tsp cayenne pepper (depending on desired level of spice)
[1] tsp garlic powder
[1] tsp smoked paprika
[1/4] cup Worcestershire made without anchovies 
[1/4] cup ketchup (cop out? Debatable)

[1] package seitan
[4] whole wheat hamburger buns

Heat a medium sauce pan to low/medium. Add the olive oil and sauté the onions with a teaspoon of salt and a few cracks of black pepper until translucent and soft. 

Mix in the tomato paste and allow to cook with the onions before adding water. After a few minutes, whisk in water, brown sugar, molasses, apple cider vinegar, spices, worcestershire and ketchup. Allow to simmer for about 15 minutes then slather it over your desired smoky staple. I had seitan (it tastes like chicken) and served them on whole wheat sandwich rolls. De-lish. 


Personal tastes for barbeque sauce vary as greatly as one's preference for perfumes or colognes, and I'm sure some BBQ aficionados would dab a little of their favorite sauce under their chin if they could. 

This is how I like mine. It's sweet, spicy and rich. If you like yours more acidic, add more vinegar. If you like yours spicy, add the full teaspoon (plus some) of cayenne. And if molasses isn't quite your speed, use a dark brown sugar instead.


 -----------------

Vegan Broccoli Slaw
Serves a crowd, with leftovers


[2] packages shredded broccoli slaw
[2] heads fresh broccoli
[3] heaping tbsp non-dairy mayonnaise 
[2] tbsp course ground mustard
[1] tbsp dijon mustard
[2] tbsp red wine vinegar
[2] tbsp agave nectar
[1] tsp salt
[1/2] tsp horseradish 

Rinse and cut broccoli florets into smaller bites, then blanch in boiling water until bright green. Remove with a slotted spoon and shock with cold water until completely cool. 

In a large serving dish, mix the broccoli with the broccoli slaw.

In a separate medium sized bowl, whisk vegan mayo, mustard, red wine vinegar, agave, salt and horseradish. Pour over the slaw and toss to combine. 

A crunchy, tangy barbeque staple... and you'd never know it was lactose free. 
-----------------

This final recipe for my Blueberry Banana Cake was the coup d'etat of the night. I made an entire cake, yet there wasn't a single crumb that lived to tell the tale. It's so moist, so banana-y, and so addicting.

My inspiration came from a non-vegan recipe that I found on Real Mom Kitchen. So, using a similar recipe from Oh She Glows, I made one of the best desserts I've ever had. And that's sayin' a lot. I'm slightly afraid, now, knowing that I won't be able to resist making it again. Continue at your own risk, but don't say I didn't warn you...


Blueberry Banana Cake with Lemon "Cream Cheese" Frosting
Makes about 15 servings (depending on how big you slice it)

For the cake:
[1 3/4] cups spelt flour
[1 1/2] tsp baking soda
[1/2] tsp baking powder
[1/2] tsp salt
[1/2] tsp cinnamon
[1] tbsp chia seeds
[4 1/2] very ripe bananas
[2] tbsp softened coconut butter
[3] tbsp olive oil
[1/2] cup agave nectar
[1] tsp vanilla extract
[1/2] lemon, juiced
[1] pint of fresh blueberries


For the Frosting:
[2] 8oz containers vegan cream cheese
[3] cups powdered sugar
[1] tsp vanilla
[2] tbsp lemon zest
[3] lemons, juiced
[2] tbsp melted coconut butter
[1] tbsp corn starch


To garnish:
[1-2] tbsp unsweetened coconut flakes
handful of blueberries and crushed raw almonds

Preheat oven to 325. Spray a baking dish (9x13) liberally with nonstick cooking spray. 

In a large mixing bowl, combine dry ingredients (spelt flour, baking soda, baking powder, salt, cinnamon and chia seeds). Make sure everything is well incorporated. 

In a small microwave-safe bowl, heat the coconut butter for about 15 seconds. Mix it up so that it's smooth and clump-less.  

In a medium mixing bowl, mash up 4 very ripe bananas with a metal fork. Add the coconut butter, olive oil, agave, lemon juice, and vanilla. Whisk like a fiend. Lastly, stir in the blueberries. 


Make a well (aka hole, or landing spot) in the center of the dry ingredients. Pour in the wet ingredients and fold them in with a rubber spatula. Once everything is incorporated, stop! As with most batters, don't overmix. Tough cookies have a time and a place... and it's not here. 

Pour into a greased baking dish and top with a blue extra blueberries. Pop it in the oven for 40 minutes. Once it's golden brown, and you've passed the toothpick test, remove from the oven. 


Cool next to an open window and watch all the boys come to the yard.  
-----------------
For the frosting, combine all ingredients in an electric mixer on low to medium speed. Pour over the cake (there will be extra for added drizzling pleasures) and top with blueberries, coconut and chopped almonds. You could definitely halve the recipe and still have enough to cover the cake, but who doesn't love a little extra sugar? FYI, the frosting becomes so much thicker after spending a couple hours in the fridge. 

Slice the cake as big as you like and serve alongside a couple big juicy strawberries or a healthy scoop of ice cream. 


Now, ascend to heaven. 


Happy June, everyone! 

Saturday, May 28, 2011

I Put the "Pea" in Potato Salad

Memoooooorial Day is coming up! (That was my Oprah voice, FYI).

You know what that means for me? Food, parties, more food, and ice cold beers.

Kidding. I don't drink beer. At least not until the 28th of June. Oh, the trials of a 20-and-11-month-year-old.

But since it is a holiday, technically, it means we're obliged to celebrate. We wouldn't want to disappoint the vets, now would we?

It should come as no surprise to you that I've already planned the complete menu for our Memorial Day Cook Out...for which I have yet to get an official parental go-ahead... I should probably do that soon...

In any case, here's an incredible summer salad that will compel you to throw a party no matter what the occasion. Woke up before 9 a.m.? Celebrate! Kept your bank account above -$1.14 this week? Celebrate! Got dressed in your workout gear with full intention to hit the gym? Mhmm, you bet.

If you had any doubts, I put the "P" in party, too.

Not only is this potato salad recipe light and healthy, it uses NO dairy, so it's 100% picnic-approved. The magic? It tastes so creamy and decadent! The starch from the potatoes combined with the olive oil vinaigrette combine to make a rich dressing that only feels like a splurge.

In reality, each serving is less than 170 calories! Compare that to your average mayo-based potato salad that can rack in a whopping 400 calories or more, with over 30 grams of fat! Tell me, would you want to slip into your American flag bikini after that? Oh...you don't have an American flag bikini? Right, no, me neither...

Whether you've got big party plans this weekend or you're in search of a great, go-to summer recipe, you simply must try this. I swear, you'll never reach for the Hellmann's again.


Summer Potato & Pea Salad 
Makes 6 servings

[1 1/2 to 2] lbs variety small potatoes (baby dutch, red bliss, new, etc.)
[1/2] lb or [10] oz english peas
[2] tbsp chopped basil
[1] tbsp chopped mint
[1/2] cup pea shoots
[2] tbsp olive oil
[1/2] tsp dijon mustard
[1] tsp lemon zest
[1] tbsp lemon juice
[1] garlic clove
salt
pepper

First, give all your little potatoes a good scrub until they're squeaky clean. If some are much larger than others (which will most likely be the case), cut the larger ones down so that they're all relatively equal in size. This will ensure even cooking.

Drop them in a large saucepan so that they spread into one even layer, then fill with cold water until the potatoes are just covered. Heavily salt the water using a heaping tablespoon and bring to a boil. Continue boiling for about 15 minutes until all the potatoes are fork tender. The potatoes will be done when you can easily pierce them with a fork. If you have some especially small ones, remove them from the boiling water at around 10 minutes.

Meanwhile, bring water to a boil in a medium saucepan. Salt the water and slowly add the peas. Allow the water to return to a boil, then cook for about 2 minutes.


Drain both the potatoes and the peas, and immediately shock both in a bowl of ice water. Let them cool completely in the ice bath, then remove with a slotted spoon.

Cut the potatoes into quarters, so that (again) they're all the same size. Transfer to a large mixing bowl along with the blanched peas and pea shoots.

For the dressing, whisk olive oil, dijon, garlic, lemon juice and zest in a small bowl. I used a 2:1 ratio of pepper to salt for the dressing, but season to your liking.

Pour the dressing over the potatoes and add the chopped mint and basil. Gently combine with a big wooden spoon, being careful not to break any of the potatoes. Finish with another couple cracks of black pepper and a sprinkling of salt, if needed.

The crisp and springy english peas and pea shoots coupled with a touch of mint make it the perfect, fresh side dish, (not to mention, effortlessly elegant).


Perfect for your next garden party...

or backyard BBQ party,

and, yes, even the party with guest count: Y-o-u. 


Wednesday, April 27, 2011

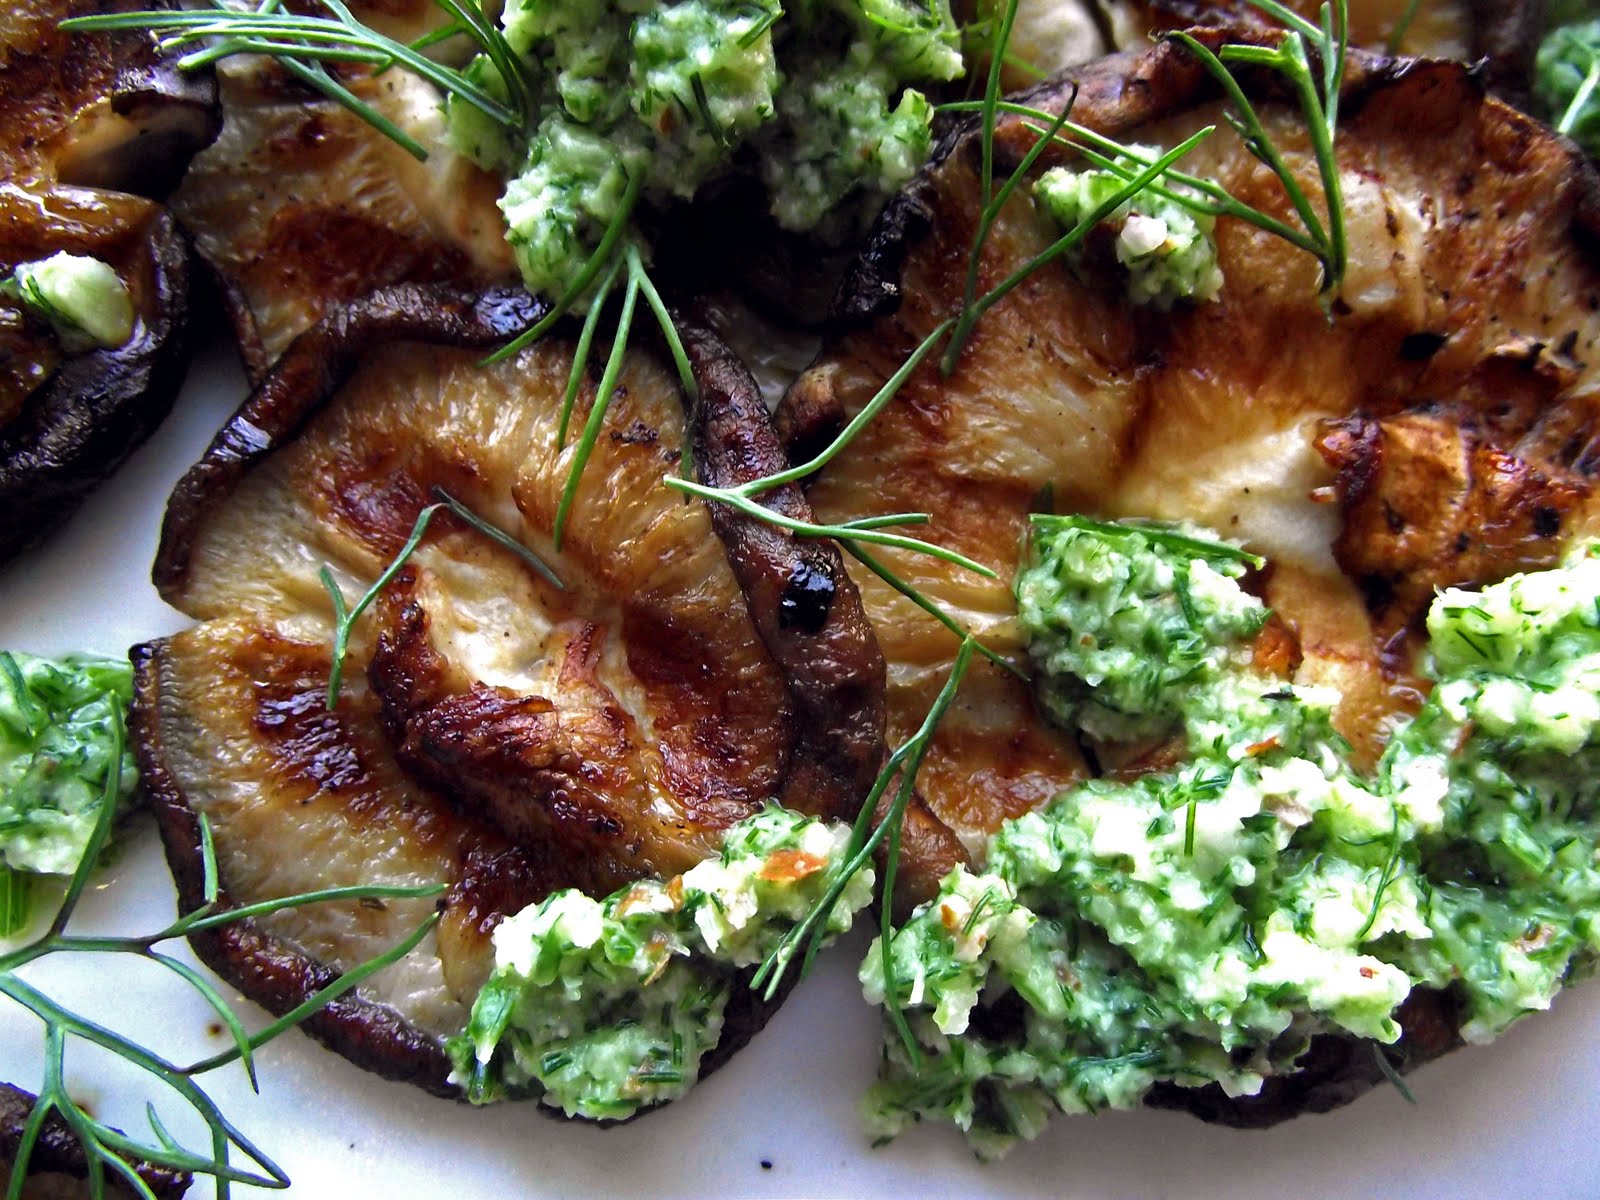
Grilled Shiitake Mushrooms with Fennel Frond Pesto


Smmmmmm ahhhhh! Smell that?

Love is in the air!

Oops! Did I say love? I meant spring. But that's still a reason to be excited!

With an unremitting forecast of weather hovering around 80 degrees, the only one who's not in good spirits is my new afro. Alas, no amount of product will keep these waves at bay. 

And if you're on campus, you've probably noticed that the fauna has reached neon levels of exceptionality. This school must keep their plant food recipe under lock and key, because grass this green has only previously been seen in dream sequences. You know the saying, "The grass is always greener"? Yeah, they were talking about Elon. 

I think it's safe to say that we can pack away our skinny jeans and cable knit sweaters for good, now. That's right, because from here on out, it's short hem-lined sundresses (wishful thinking) lax pinnies all day, every day. Definitely no complaints from this girl.

Well, maybe one. 

I have no doubt that every student can relate to this-- the productivity degeneration that occurs every time the sun shines. While going to school in the south gives us shorter winters and and year-round tans, it also makes doing work that much harder. An 85 degree SURF day celebration just doesn't look as fun on the flip side of a library window. 

And with final exams marching in like the Hun army just as we bust out the SPF, I feel doomed for deadbeat city. 

While I can't offer any solutions yet, (I'm still trying to figure out a plan of attack for these last few projects) I can offer some recipes that provide temporary liberation from that daunting workload. At the very least, trying one of these healthy meals may trick your brain into thinking that you're being productive. And maybe then, you can open up Word. 


Fennel Frond Pesto 
Makes about 1 cup

[2] cups fennel fronds, plus [1] tsp
[3/4] cup chopped fennel stalk
[3] tbsp raw almonds, whole
[1] garlic clove
[1] lemon, juice
[2] tbsp olive oil
[1] tsp salt
[1] tsp cracked black pepper
[1/4] cup water

Place fennel fronds and chopped stalk, almonds, garlic, lemon juice, olive oil, salt and pepper in a food processor (or blender) and puree until well combined. If the mixture is too thick, add up to [1/4] cup of water. You could also add more olive oil, but to keep it light, stick with water. When the pesto reaches a thick and even consistency, transfer to a small serving dish.


For the mushrooms:
[3.5] oz Shiitake mushrooms
non-stick cooking spray
salt
pepper

Start by preheating a grill pan to high. Remove stems from the mushrooms, then season them with salt and pepper. Once the grill is hot, spray it with the non-stick cooking spray and arrange the mushrooms around the grill, cap side down. Cook for about 5 minutes, then flip and continue cooking for another couple minutes.

To plate, arrange mushrooms on a dish and top with about a couple tablespoons of the pesto. Garnish the plate with a teaspoon of fresh chopped fennel fronds and a drizzling of olive oil.

The fennel, lemon and almond combo make a really unique pesto that's not too overpowering. And come on, grilled mushrooms really are just the greatest. 


A springtime recipe so gratifying, Peter Rabbit himself would forgo his carrot addiction. But he'd probably never admit that... 

Monday, April 25, 2011

Vegetarian Yellow Curry


There was a time, not too long ago, when I would not go near a curry dish.

Had I ever tried it? Well, not exactly. But anything that reminded me of sweaty-man-pit was staying far away my dinner plate. 

Fortunately, I relinquished my naive preconceptions on a trip to London last semester. Outside of India, London is pretty much the capital of curried cuisine. And if I was going to try Indian food anywhere, this was my chance. 

Holy Shiva. To say that I fell in love would be an understatement. In between bites of garlicky naan and spicy Chana Masala, I was hating myself for refusing to try this sooner. Each dish was spicy in a way that didn't singe my tastebuds, and flavorful in a way that I'd definitely never experienced before.

That motley indian feast that I shared with my Dad and sister remains to be my most memorable. You can bet that I rolled out of that place with more than a full belly, but also a new appreciaition for an entirely foreign cuisine. I brought my excitement for curry back with me to Paris, and it's still one of my favorite flavors. 

Luckily, I found a curry dish (though Thai, not Indian) that I cannot get enough of. And I don't need a plane ticket to have it... just thirteen bucks.

It's Simply Thai's Tofu Yellow Curry with brown rice, and after ordering a couple dozen times, I realized it was time to make it myself. At least for my wallet's sake. 

Not to toot my own horn or anything, but this vegetarian curry dish had me asking Simply Who? I was pleasantly surprised to find that my version was almost exact-- only better. (And unlike Anna's Thai Sushi, it didn't make me sick. But that's a different story). As I write this, I'm having a hard time resisting the urge to run and make it again.  

The kicker? I prepared it using only my microwave. With the leftovers from my Thai Coconut Curry Sauce, a little tweaking, and some easy steamed veggies, I had a meal in less than 10 minutes. Whether I was still on a high from nailing my go-to takeout meal, or whether this recipe is actually my new favorite, it's guaranteed to satisfy. 


Vegetarian Yellow Curry
Makes 2 servings 


[1] cup Thai Coconut Curry Sauce
[1/2] tsp curry powder
[1/2] tbsp low sodium soy sauce
[1] medium sweet potato
[1/2] cup chopped yellow onion
[1] tbsp chopping scallion

Add the curry power and soy sauce to the remaining Coconut Curry Sauce. Mix and heat in the microwave for about 2 minutes.

Using a metal fork, poke multiple holes in the sweet potato. Microwave for 3 minutes on one side, then flip and heat for an additional 2 minutes. Let potato cool slightly and cut into 1 inch cubes.

Next, steam chopped in onion in a microwave safe dish with a tablespoon of water for about 2 minutes. To replicate the Simply Thai version exactly, you could also add tofu and steamed carrots.

Finally, pour the hot curry sauce over the chopped vegetables. Garnish with fresh scallions and a little rice, then relish in the fact that a delicious meal like this took just 10 minutes... minus the hassle of takeout.

Pretty soon, the only menu you'll be mulling over will be on date night, when the chances of you paying are... 50/50. (Because after all, we are at Elon).


I added a little leftover rice, too!

Friday, April 22, 2011

Simple Thai


Have you ever noticed the absurd amount of restaurants in Burlington? I mean like, actually realized how many options there are?

With such a mind blowing variety, you'd almost mistake this whistle-stop for being culturally diverse. We can thank them for broadening our dining horizons. I, for one, don't know what I'd do without La Fiesta, La Cocina, Mar Y Sol, Pancheros, Moe's, Qdoba, Cancun or even Taco Bell.

And thank goodness that whenever I'm cravin' asian, I can choose between Red Bowl, China Gate, Simply Thai, Hibachi, Hong Kong, Anna's Thai Sushi, Panda Express, China Inn Buffet, Harusaki or Tokyo Express.

Nowadays, that tiny drawer I once chose to store menus has become so stuffed, it barely even closes. I'm lookin' at you, China Gate. Slipping six copies of your menu under my door still doesn't make me like you.

Ordering take-out around here quickly goes from being the perfect lazyman's solution, to being the most complicated decision process of the day. Kind of counteracts the whole reason why you're ordering take-out in the first place...

Unfortunately we know, it's inescapably necessary-- there's nothing worse than diner's remorse. Or as my roommate Danielle calls it, food regret. And no, I'm not talking about the side order of guilt that comes free with your hush puppies. Food regret occurs when you don't take adequate time to consider each option, and suddenly your Greek salad with chicken looks pitiful next to your friend's pepperoni calzone. Shit.

So, in the 30 minutes (or hour if it's Mike's Deli) that it usually takes for the delivery guy to track down your address, you can make this delicious rice dish and save yourself the $8.74 plus tip. I guarantee, it's a whole lot better than the stuff you get in styrofoam.


Thai Coconut Curry Sauce with Brown Basmati Rice
Makes 1.5 cups of sauce or about 6 servings 
*For serving, use 1/4 cup of sauce for every 2 cups of cooked rice


Organic Brown Basmati Rice
[1] tsp canola oil
[1/2] tbsp minced garlic
[1] small red chili pepper, minced
[1] tbsp minced ginger
[1] can organic light coconut milk (13.5 fl oz)
[1/2] tsp curry powder
Dash of cayenne pepper
[1/2] tbsp soy sauce
[1] tbsp chopped basil
Juice of 1 lime
Black sesame seeds
[1] tbsp chopped scallions for garnish


Start by heating a small sauce pan to medium/low heat. Drizzle in 1 teaspoon of canola oil and heat for about a minute. Drop in the garlic and sauté until it just starts to tan. Then bring the ginger and red chili pepper to the party, turn up the heat to medium, and cook for about 3 minutes. 


Next, stir in the coconut milk. Add the curry powder, soy sauce, and as much cayenne pepper as you can handle and whisk it all together. Turn up the heat to medium and let it cook until simmering. 


When the sauce is bubbling, take off the heat and stir in lime juice and chopped basil. 


Cook rice according to package instructions. I actually used a 90 second rice-in-a-bag because I couldn't find a boxed rice that I liked, so this step took no time at all. It made 2 servings (1 cup each). 


Finally, combine the rice, sauce, and black sesame seeds in a bowl. The hot rice will absorb the creamy, zesty sauce. For garnish, top each serving with a bundle of chopped scallions. 


So, the next time you're looking for a fast and easy dinner solution, put away your take-out menus and consider making this savory version of a thai classic. 


*This recipe obviously makes a lot of sauce, so either cook a lot of rice reserve the rest for later! Click here to find out what I did with the leftovers!


Wednesday, April 20, 2011

Hump Day Fun with a Burger: Paradise Found

Hump day.

What a day, what a day.

As we slide out of the agony of a cruel Monday/Tuesday suckerpunch combo, we're given a false sense of hope that the weekend is actually within reach.

Midway through our seven day stretch, like an uncertain limbo, Wednesdays present the difficult question: to drink, or not to drink?

Luckily, this particular Wednesday is...special.

So pick your poison-- whether you're singing "Bottom's Up" or "Burn One Down," everyone deserves a hearty treat to get them over the midweek hurdle.

In honor of a day when your hunger pangs cry just a little louder, here's a recipe that'll make you drool. And since a day like today only comes around once a year, don't let anyone make you feel bad about drooling.


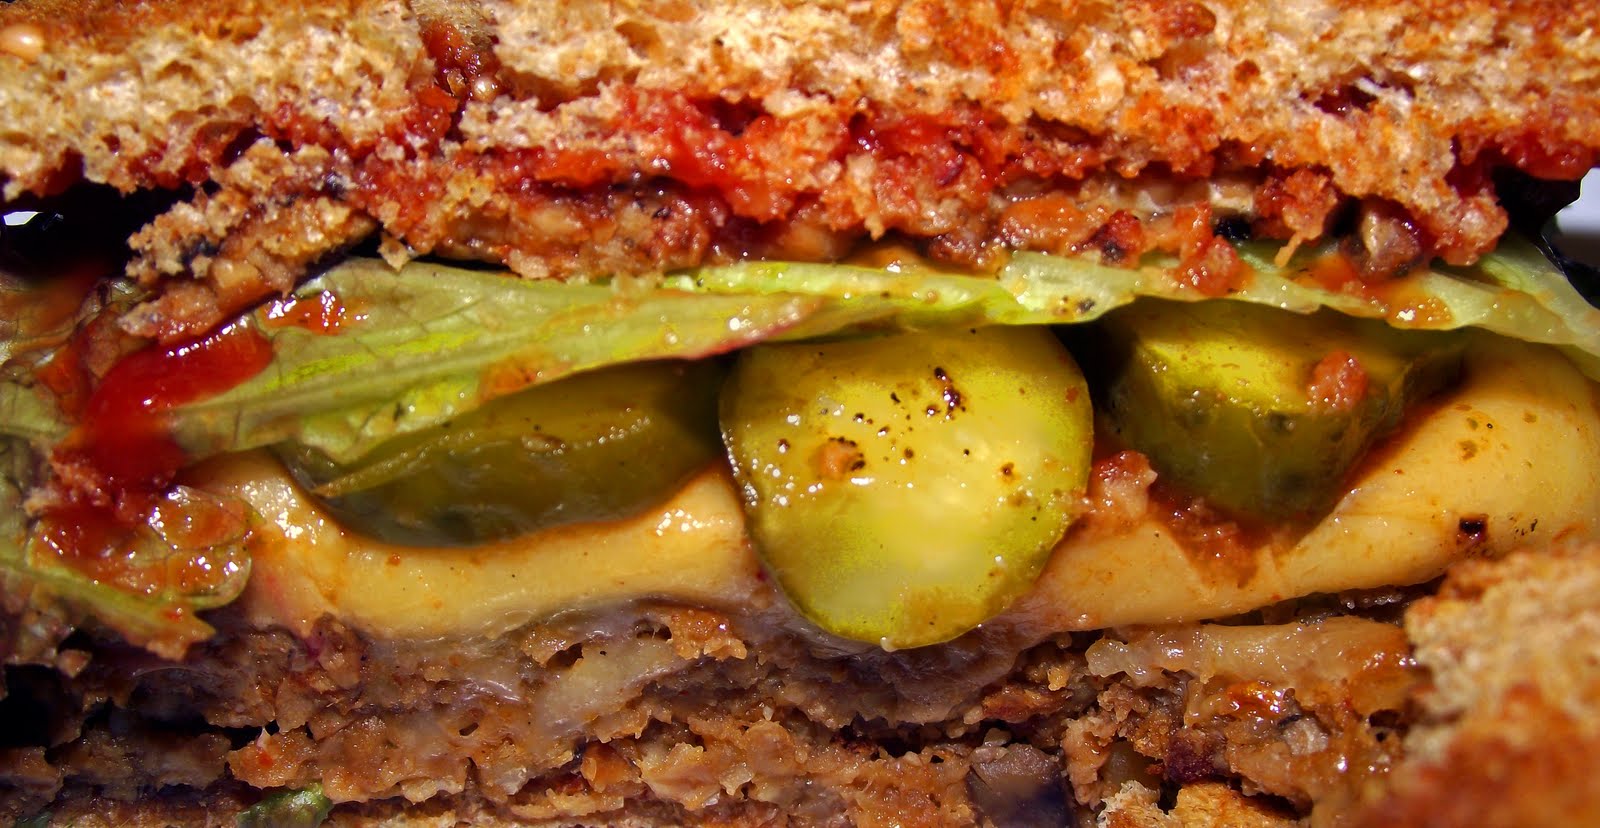
Healthy Cheeseburger in Paradise
Serves 1

[2] slices organic whole grain bread
[2] slices Tempeh Smoked "Bacon"
[1] vegan burger (my favorites are Boca Original Vegan Burger and Amy's Quarter Pound Veggie Burger)
[2] oz vegan cheese (I used Vegan Gourmet Cheddar Style)
[1] tbsp sliced pickles
[1] large leaf lettuce
[1] slice tomato
[1] tbsp ketchup
[1] tbsp Veganaise mayo (optional)

Toast the bread in a toaster oven. Tricky, I know. It gets more complicated so pay attention...

Defrost your burger in the microwave for 1-2 minutes.

Heat a skillet to medium/high heat. Spray with a nonstick cooking spray and add the Tempeh Bacon. Cook until browned on both sides. Set aside.

Add burger to the pan and cook evenly on both sides until browned. Top with vegan cheese, and cook for about 3 more minutes, covered, until the cheese melts and the burger is warmed through.

Assemble the burger to your liking, adding or taking away ingredients so that your final creation turns into a little bite of paradise.

Now plop down on your sofa and picture your uninhibited weekend self laughing the day away. It will come soon enough, I promise.


Chomp.


And for all of you who have likened vegan food to the diet of a certain Easter icon, I hope you've learned something.

Because yes, from time to time, vegans crave cheeseburgers.


The End.


And Happy Holidaze to all.

Thursday, April 7, 2011

Moroccan Wheat Berry Salad

In case you found a way to dodge my steady stream of social media abuse this past weekend, you know that I recently journeyed back to my homeland of Red Sox Nation to cross a few things off my checklist. While in Boston, I was lucky enough to:
  1. Celebrate my dear mother's 30th birthday 
  2. Visit my long-lost-best-friend and supermodel, Catherine Way
  3. Land an internship (er, kind of)
  4. Guzzle down enough carbs to fuel an oil tanker
  5. Take part in a life changing seminar by the Four-Time James Beard Award Winning food writerDavid Leite 
I swear none of that was exaggerated...


Okay, fine, some of it was. Hush. But after my weekend of merriment, I can't stop doing this:


In fact, last weekend's activities soared so far beyond my expectations, I could have flown home on my own Cloud Nine. I had, so naively, assumed that I would walk out of the Boston University seminar with just a few helpful hints on how to get people to read about what I slap up here. 

I had no idea that someone as marvelously reputable as David would be catering our discussion to questions that I asked... like, little old me! 

I relished in every possible second of his golden wit. And yeah, I kind of want to be him. 

David versed us on everything from creating recipes, to submitting proposals, to the art of food blogging. And he was hilarious, to boot. Please check out his website so you can understand what I'm talking about! 

I found that there was but one downside to his lecture, and I hesitate to even say it... 

Apparently, my Ralph Lauren Superman (aka the illustrious Ina Garten) has a serious 'tude when it comes to writing about her recipes. I know, I know. It's practically sacrilege to tarnish my guru's Teflon reputation. But don't let her impeccably ironed button-down and loyalty to fabulosity fool you; this Hampton queen is apparently quite the hardass. 

Let's move on, I'm currently trying to repress this in my memory. 

I'm pretty jazzed about this next recipe. I've been holding on to the idea for a while now, and after making it, I have no idea why. I thought that I'd need a substantial chunk of time to cook the wheat berries, but they took less than 20 minutes. And in the meantime, you can prepare everything you need for the finished product.

The flavors are definitely different. I used three ingredients for the first time, here, and I'm happy to say it turned out great. See what can happen with a little experimentation? Beautiful things, people. 

I can now confidently say that wheat berries, dried currants, and Meyer lemon hold a place among my novelty food vanquishes. I get that the ingredients in this salad may not be terribly approachable to a palette tuned to Sunset Strips, but just give 'em a chance...

Because Brian Williams said so.


Moroccan Wheat Berry Salad
Serves 4
           
[1] cup dry wheat berries 
     (makes 2+ cups cooked)
[1/3] cup chopped fresh mint
[1] cup dried currants
[1/2] cup shredded carrot
[1/4] cup Meyer Lemon Curry vinaigrette (recipe as follows)

For the vinaigrette:
[2] Meyer lemons, juiced*
[1] tsp olive oil
[1] tsp curry powder
[1] tbsp course ground Dijon mustard
[1] tbsp rice wine vinegar
[1] tsp agave nectar

Start by lightly toasting wheat berries in a dry medium saucepan. Remember to keep an eye on them, shaking the pan occasionally... I let my A.D.D. get the best of me and some of these suckers burned. After about 2-3 minutes, pour in the water and bring to a boil, then reduce heat and simmer for 15-20 minutes covered. Package directions may vary so check the instructions on the back.


Place chopped mint, dried currants and shredded carrots in a large bowl. 


Once the wheat berries are cooked (they should be chewy), drain and rinse them with cold water to stop the cooking. If you add the hot wheat berries to the fresh mint, the mint will turn brown. And it will be ugly. After the wheat berries have cooled, dump them in the bowl with the rest of the crew. 


To make the vinaigrette, whisk lemon juice, olive oil, curry powder, dijon, vinegar, and agave together in a small bowl, then pour over the mixture and combine. The resulting dressing will be a beautiful golden yellow. 

You're going to want to eat this right away, not only because it's irresistibly flavorful, but because the colors become muted after some time. And you know how much I love color.

But somehow, I doubt that advising you to devour with haste is the worst suggestion I could make.

*Meyer lemons are sort of a mix between and orange and a lemon. They're much sweeter and add great flavor without being too sour.